 Facebook now allows a custom tab to be created for any page. Remember, profiles are for individuals and pages are for brands like Chick-fil-A, Compassion International or an artist like me.
When fans “like” a page the brand is able to message them. That’s the purpose of most pages – to establish contact between the brand and its fans. I’m taking a slightly different approach. Sure, I’d like to be able to communicate with fans but I think I do that best via e-mail, my blog, and in person at concerts. So I’ve built a tab on my page pointing people in those directions. Here’s how I did it.
Design
Facebook limits Facebook tabs to 520 pixels in width. Using Photoshop I designed a tab that borrowed from and mimicked the excellent design work Brad Ruggles and Barton Damer did on shaungroves.com. This way branding is consistent at home, Twitter and Facebook.
I kept the design very simple – rows that could be easily sliced up later. Here’s the design in Photoshop with the guides for slicing marked by blue lines.
Tabsite Table
After slicing the design into 13 smaller images, I opened a free TabSite account. The free account places an add at the bottom of my tab on Facebook, limits the number of sub-pages that can be created in my tab, and limits the amount of storage space I have available when uploading images to TabSite.
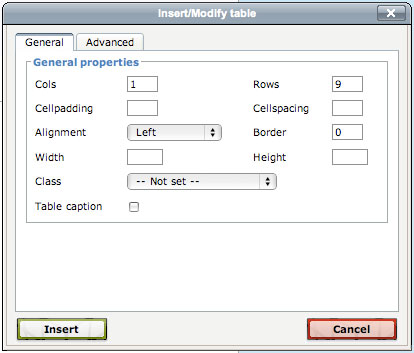
Once following the easy directions to link TabSite to my Facebook account, I built my tab by first going to the “TabSite Manager” and uploading my 13 images. TabSite Manager is a WSIWYG editor. In the editor I clicked the “table” button to create a table. I told it I wanted a table with 1 column and 9 rows.
Next, I inserted each image into its row in the table.
When two images needed to go side-by-side in a row a little coding was needed – and provided by my web guru Ben Stewart. I highlighted each image in a pair one by one, clicked on the “link” button in the editor (looks like a chain link). When the link menu popped up I chose “Advanced” and entered a bit of code that includes the width of each image.
While I was in the link menu I entered the URL I wanted each image to link to.
Publish
When I was done linking all the images, I just hit “Save and Post To Wall.” Then I went to my Facebook page and set the new tab to be the default landing page for anyone visiting my page who has not “liked” it yet.
Here’s the finished Facebook tab, created quickly and for free.
Got a better way of creating a Facebook tab? Tell me about it.
 Shaun Groves


Jolanthe says:
You rock!
That is all. 🙂
Kristie Wooten says:
Spoken like a true homeschool daddy! 😉
Now, I’ll be trying all day to think of ways that I can use this information to build something…(because that’s what all teachers–homeschool moms included–do…we borrow and reproduce strategies from folks smarter than we are). Thanks!
Great seeing you and your web guru on Friday night! One day–we’ll see you in Thomasville again!
Shaun Groves says:
I figured out why I didn’t recognize you at first. THE GLASSES! And no baby in front of you ; )
Great seeing you too.
Kristie Wooten says:
Trying again with a new Gravatar…guess I really did need to update! 🙂 The previous pic was with my nephew…the first pic taken once I had lost enough weight to stop being camera shy. My children appreciate the new Gravatar since it’s actually a photo with THEM in it. 🙂 Now maybe maybe my blog buddies will recognize me if I see them in random places.
JessicaB says:
I totally did something similar on my blog fanpage this past week, but through slightly different means, using advice I found at Bloggingwithamy. http://bloggingwithamy.com/how-to-create-a-facebook-landing-page-using-iframes/
Lurv it.
Cathy says:
I guess facebook couldn’t handle the awesomeness because it’s been down all evening. 🙂
CardsFan says:
O.K. I guess.
If it’s all the same to you, I think I’ll skip the facebook that my wife seems so connected to and continue to leave your blog bookmarked in my browser. I know – I’m so early 2000’s!! I can live with that!
Shaun Groves says:
I’d prefer that too. And I’m grateful to be bookmarked. Very. Thanks for reading.
Trena says:
Odd that I read your blog regularly and THIS is the post I chose to comment on!? First I’ll say I am frequently challenged, often snorting with laughter and regularly sharing posts with our staff. Good stuff!
Now I’m trying to figure out why this tab thing would benefit our church’s fb page. I’m not disputing just trying to figure out if it is worth pursuing to improve our communication. Can you give any additional thoughts on this?
Thanks!
John Cade says:
Trena,
Here’s a few ideas:
* E-newsletter signup
* Newsletter (Post the whole thing or offer as download)
* Upcoming events
* List next week’s music/sermon topic
* Link to sermon download/podcast (or embed it)
* Get to know the church staff
This is just the tip of the iceberg… I’m sure there will be several more great ideas.
John Wilkerson says:
Trena,
One thing you could do is make this tab your default destination for people who haven’t “Liked” your church’s FB page yet. You can provide information about your church like service times, location, and contact info that’s easy to see and read unlike the small text that appears when people click on the “Info” tab.
Additionally, you can link back to your church’s website. FB could act as a portal to your church’s podcast, blog, event calendar, etc.
Cheers,
John
Jeanna Baker says:
i am not much of a tech gal, but as someone who attends a church with a facebook page, i really wish they had a tab with their podcasts… i know you can do it, i have seen musicians put their mp3’s on a “music” tab, so surely a church could do that for a “sermon” tab?? i don’t always make service, and for my husband who is deployed, there are times when i just wish it could be easy for him to listen to what i am listening to… i dont know just a thought, like i said, i have no idea how that stuff works, i barely twit, or tweet??
Trena says:
Folks,
Thanks for the ideas! It sounds as if it is not necessarily an additional tool but one that is used in conjuction with our other tools already in place…newsletter, website, podcasts, etc. but will just get them back to our website which houses it all. Makes sense! Thanks again!